

Open a head on testnet
This tutorial demonstrates how to use hydra-node on Cardano's preprod testing environment to open a layer 2 state channel between two participants using the Hydra Head protocol. We'll also use Mithril for fast node bootstrapping.
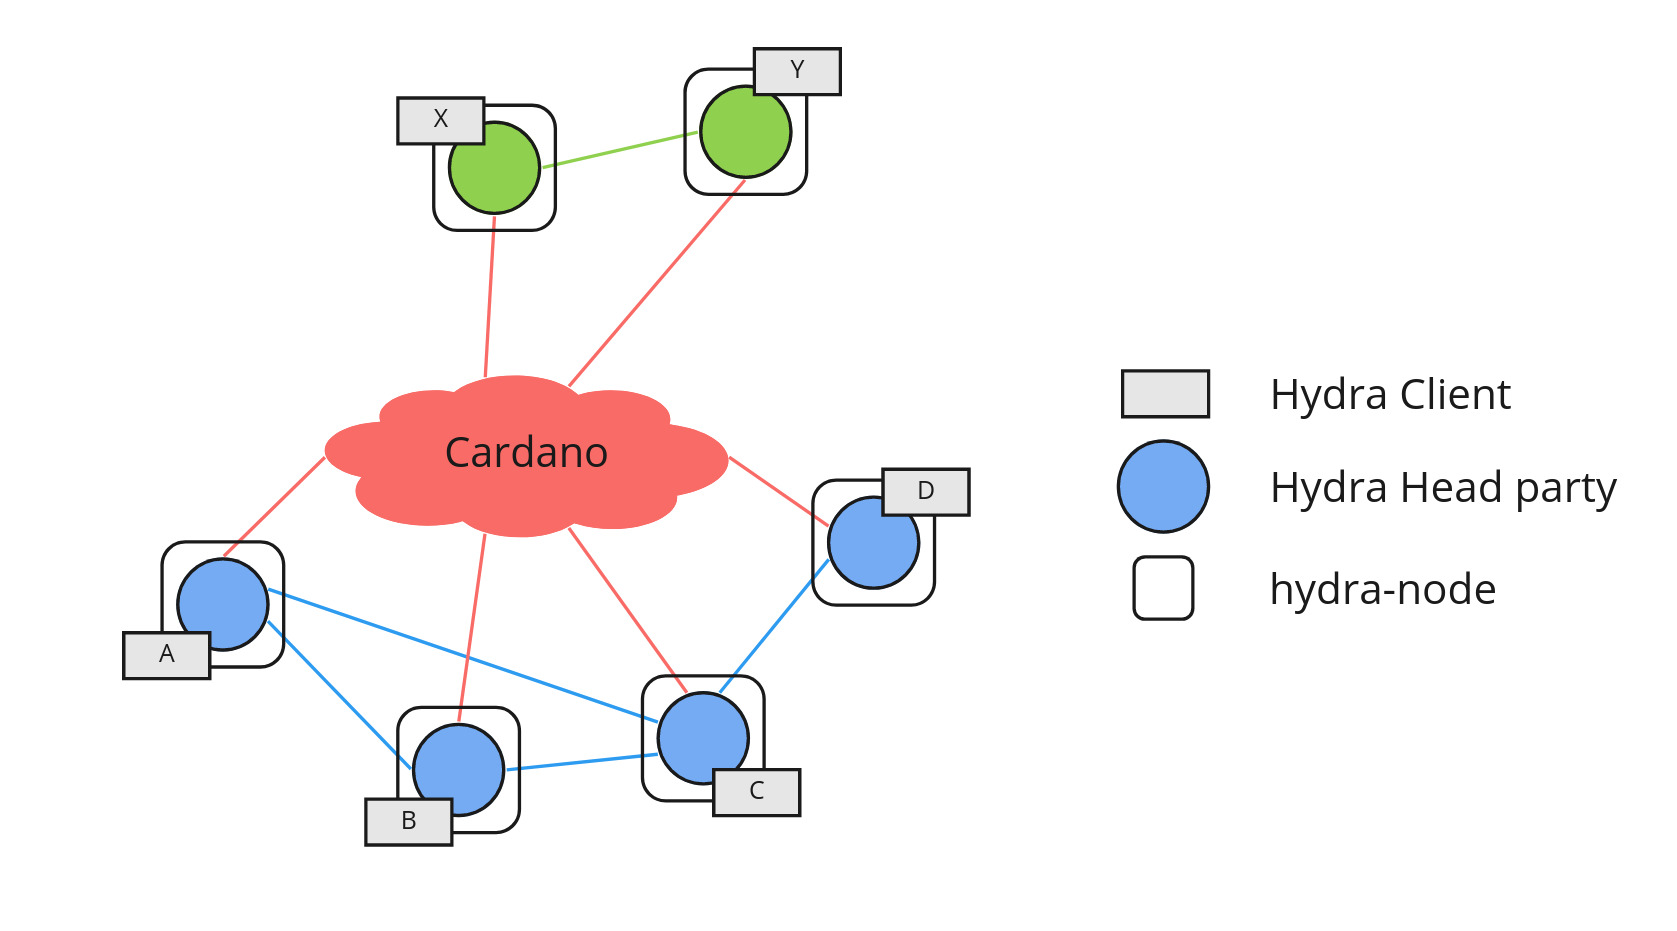
This setup follows the basic Hydra Head topology, establishing the 'green' Hydra Head between X and Y as shown below:
Prerequisites
- Terminal access to a machine which is reachable from the internet (forwarded ports)
- Either:
- Another participant following this tutorial (recommended), or
- Access to two such machines
- 100 test ada per participant in a wallet on the
preprodnetwork.
Step 0. Installation
This tutorial assumes the following tools are available on your system:
After ensuring the tools above are available, begin by downloading pre-built binaries of the involved Cardano software components and placing them in a bin/ directory:
- Linux x86-64
- Mac OS aarch64
mkdir -p bin
hydra_version=0.19.0
mithril_version=2430.0
cardano_node_version=9.1.1
curl -L -O https://github.com/cardano-scaling/hydra/releases/download/${hydra_version}/hydra-x86_64-linux-${hydra_version}.zip
unzip -d bin hydra-x86_64-linux-${hydra_version}.zip
curl -L -O https://github.com/IntersectMBO/cardano-node/releases/download/${cardano_node_version}/cardano-node-${cardano_node_version}-linux.tar.gz
tar xf cardano-node-${cardano_node_version}-linux.tar.gz ./bin/cardano-node ./bin/cardano-cli
tar xf cardano-node-${cardano_node_version}-linux.tar.gz ./share/preprod --strip-components=3
curl -L -o - https://github.com/input-output-hk/mithril/releases/download/${mithril_version}/mithril-${mithril_version}-linux-x64.tar.gz \
  | tar xz -C bin mithril-client
chmod +x bin/*
mkdir -p bin
hydra_version=0.19.0
mithril_version=2430.0
cardano_node_version=9.1.1
curl -L -O https://github.com/cardano-scaling/hydra/releases/download/${hydra_version}/hydra-aarch64-darwin-${hydra_version}.zip
unzip -d bin hydra-aarch64-darwin-${hydra_version}.zip
curl -L -O https://github.com/IntersectMBO/cardano-node/releases/download/${cardano_node_version}/cardano-node-${cardano_node_version}-macos.tar.gz
tar xf cardano-node-${cardano_node_version}-macos.tar.gz --wildcards ./bin/cardano-node ./bin/cardano-cli './bin/*.dylib'
tar xf cardano-node-${cardano_node_version}-macos.tar.gz ./share/preprod --strip-components=3
curl -L -o - https://github.com/input-output-hk/mithril/releases/download/${mithril_version}/mithril-${mithril_version}-macos-x64.tar.gz \
  | tar xz -C bin
chmod +x bin/*
Next, set various environment variables to simplify command execution. Ensure each terminal you open to run these commands has these environment variables defined.
- Linux x86-64
- Mac OS aarch64
export PATH=$(pwd)/bin:$PATH
export GENESIS_VERIFICATION_KEY=$(curl https://raw.githubusercontent.com/input-output-hk/mithril/main/mithril-infra/configuration/release-preprod/genesis.vkey 2> /dev/null)
export AGGREGATOR_ENDPOINT=https://aggregator.release-preprod.api.mithril.network/aggregator
export CARDANO_NODE_SOCKET_PATH=$(pwd)/node.socket
export CARDANO_NODE_NETWORK_ID=1
export DYLD_FALLBACK_LIBRARY_PATH=$(pwd)/bin
Other installation options
- Docker containers are published regularly
- Some projects provide system-level packages for installation and/or pre-built binaries for various platforms
- Building from source is always an option
- Some projects provide system-level packages for installation and/or pre-built binaries for various platforms
- Building from source is always an option.
Please check out each project's GitHub pages for more options.
Step 1. Connect to Cardano
The Hydra Head protocol requires a connection to Cardano layer 1 to verify and post protocol transactions in a trustless way. Start by setting up a cardano-node on the public testnet. With Mithril, you can skip synchronizing the whole history and get started quickly.
Download the latest blockchain snapshot using mithril-client configured for the preprod network:
mithril-client cardano-db download latest
NixOS workaround
The dynamically linked mithril-client binary may not function out-of-the-box on NixOS.
You can workaround this by emulating a common Linux FHS environment:
alias mithril-client="steam-run mithril-client"
If you have a better solution or want to contribute static binaries to the mithril CI, PRs are welcome!
Next, run a cardano-node:
cardano-node run \
  --config config.json \
  --topology topology.json \
  --socket-path ./node.socket \
  --database-path db
Once all the blocks have been replayed, you can monitor the synchronization
status using cardano-cli in a separate terminal window while the node
runs:
cardano-cli query tip
This should show something like:
{
  "block": 1275938,
  "epoch": 88,
  "era": "Babbage",
  "hash": "7d22ae918f3ffd35e18c5a7859af27dbcbd29fe08f274b76c284c00042044a2e",
  "slot": 36501000,
  "slotInEpoch": 126600,
  "slotsToEpochEnd": 305400,
  "syncProgress": "100.00"
}
Bash auto-completion
Enhance your bash experience with auto-completion for cardano-cli:
source <(cardano-cli --bash-completion-script cardano-cli)
Step 2. Prepare keys and funding
First, generate Cardano key pairs and addresses for both participants to identify the hydra-node and manage funds on layer 1:
- Alice
- Bob
mkdir -p credentials

cardano-cli address key-gen \
  --verification-key-file credentials/alice-node.vk \
  --signing-key-file credentials/alice-node.sk

cardano-cli address build \
  --verification-key-file credentials/alice-node.vk \
  --out-file credentials/alice-node.addr

cardano-cli address key-gen \
  --verification-key-file credentials/alice-funds.vk \
  --signing-key-file credentials/alice-funds.sk

cardano-cli address build \
  --verification-key-file credentials/alice-funds.vk \
  --out-file credentials/alice-funds.addr
mkdir -p credentials

cardano-cli address key-gen \
  --verification-key-file credentials/bob-node.vk \
  --signing-key-file credentials/bob-node.sk

cardano-cli address build \
  --verification-key-file credentials/bob-node.vk \
  --out-file credentials/bob-node.addr

cardano-cli address key-gen \
  --verification-key-file credentials/bob-funds.vk \
  --signing-key-file credentials/bob-funds.sk

cardano-cli address build \
  --verification-key-file credentials/bob-funds.vk \
  --out-file credentials/bob-funds.addr
Next, fund these addresses. If you have test ada on the preprod network, distribute it to the newly created addresses:
- Alice
- Bob
echo "Send at least 30 tADA to alice-node:"
echo $(cat credentials/alice-node.addr)"\n"

echo "Send any amount of tADA or assets to alice-funds:"
echo $(cat credentials/alice-funds.addr)"\n"
echo "Send at least 30 tADA to bob-node:"
echo $(cat credentials/bob-node.addr)"\n"

echo "Send any amount of tADA or assets to bob-funds:"
echo $(cat credentials/bob-funds.addr)"\n"
In case you don't have test ada on preprod, you can use the testnet faucet to fund your wallet or the addresses above. Note that due to rate limiting, it's better to request large sums for efficiency and distribute as needed.
Something like the following (if you used the faucet to give funds only to alice-funds.addr):
# Get alices UTxO state
cardano-cli query utxo \
    --address $(cat credentials/alice-funds.addr) \
    --out-file alice-funds-utxo.json

# Build a Tx to send funds from `alice-funds` to the others who need them: bob
# funds and nodes.
cardano-cli transaction build \
    $(cat alice-funds-utxo.json | jq -j 'to_entries[].key | "--tx-in ", ., " "') \
    --change-address $(cat credentials/alice-funds.addr) \
    --tx-out $(cat credentials/bob-funds.addr)+1000000000 \
    --tx-out $(cat credentials/bob-node.addr)+1000000000 \
    --tx-out $(cat credentials/alice-node.addr)+1000000000 \
    --out-file tx.json

cardano-cli transaction sign \
  --tx-file tx.json \
  --signing-key-file credentials/alice-funds.sk \
  --out-file tx-signed.json

cardano-cli transaction submit --tx-file tx-signed.json
You can check the balance of your addresses via:
- Alice
- Bob
echo "# UTxO of alice-node"
cardano-cli query utxo --address $(cat credentials/alice-node.addr) --out-file /dev/stdout | jq

echo "# UTxO of alice-funds"
cardano-cli query utxo --address $(cat credentials/alice-funds.addr) --out-file /dev/stdout | jq
echo "# UTxO of bob-node"
cardano-cli query utxo --address $(cat credentials/bob-node.addr) --out-file /dev/stdout | jq

echo "# UTxO of bob-funds"
cardano-cli query utxo --address $(cat credentials/bob-funds.addr) --out-file /dev/stdout | jq
Next, generate Hydra key pairs for use on layer 2. Use the
hydra-tools to generate the keys for alice and/or bob respectively:
- Alice
- Bob
hydra-node gen-hydra-key --output-file credentials/alice-hydra
hydra-node gen-hydra-key --output-file credentials/bob-hydra
If you are collaborating with another individual, exchange the verification (public) keys: {alice,bob}-node.vk and {alice,bob}-hydra.vk to ensure secure communication.
Before launching the hydra-node, it's crucial to establish and communicate each participant's network connectivity details. This includes the IP addresses and ports where Alice and Bob's nodes will be reachable for layer 2 network interactions. For this tutorial, we're using placeholder IP addresses and ports which should be replaced with your actual network details:
Alice: 127.0.0.1:5001
Bob: 127.0.0.1:5001
The next step involves configuring the protocol parameters for the ledger within our Hydra head. For the purposes of this tutorial, we'll modify the default Cardano layer 1 parameters to eliminate transaction fees, simplifying test interactions:
cardano-cli query protocol-parameters \
  | jq '.txFeeFixed = 0 |.txFeePerByte = 0 | .executionUnitPrices.priceMemory = 0 | .executionUnitPrices.priceSteps = 0' \
  > protocol-parameters.json
This command adjusts the fees and pricing mechanisms to zero, ensuring that transactions within the Hydra head incur no costs.
In summary, the Hydra head participants exchanged and agreed on:
- IP addresses and the port on which their
hydra-nodewill run - A Hydra verification key to identify them in the head
- A Cardano verification key to identify them on the blockchain
- Protocol parameters to use in the Hydra head.
Step 3. Start the Hydra node
Scripts are pre-published for all released HYDRA_VERSIONs of the hydra-node and common Cardano networks. Consult the user manual for guidance on publishing your own scripts.
Start the hydra-node using these parameters:
- Alice
- Bob
hydra_version=0.19.0
hydra-node \
  --node-id "alice-node" \
  --persistence-dir persistence-alice \
  --cardano-signing-key credentials/alice-node.sk \
  --hydra-signing-key credentials/alice-hydra.sk \
  --hydra-scripts-tx-id $(curl https://raw.githubusercontent.com/cardano-scaling/hydra/master/networks.json | jq -r ".preprod.\"${hydra_version}\"") \
  --ledger-protocol-parameters protocol-parameters.json \
  --testnet-magic 1 \
  --node-socket node.socket \
  --api-port 4001 \
  --host 0.0.0.0 \
  --api-host 0.0.0.0 \
  --port 5001 \
  --peer 127.0.0.1:5002 \
  --hydra-verification-key credentials/bob-hydra.vk \
  --cardano-verification-key credentials/bob-node.vk
hydra_version=0.19.0
hydra-node \
  --node-id "bob-node" \
  --persistence-dir persistence-bob \
  --cardano-signing-key credentials/bob-node.sk \
  --hydra-signing-key credentials/bob-hydra.sk \
  --hydra-scripts-tx-id $(curl https://raw.githubusercontent.com/cardano-scaling/hydra/master/networks.json | jq -r ".preprod.\"${hydra_version}\"") \
  --ledger-protocol-parameters protocol-parameters.json \
  --testnet-magic 1 \
  --node-socket node.socket \
  --api-port 4002 \
  --host 0.0.0.0 \
  --api-host 0.0.0.0 \
  --port 5002 \
  --peer 127.0.0.1:5001 \
  --hydra-verification-key credentials/alice-hydra.vk \
  --cardano-verification-key credentials/alice-node.vk
Verify that the node is operational by establishing a WebSocket connection to the API port:
- Alice
- Bob
websocat ws://127.0.0.1:4001 | jq
websocat ws://127.0.0.1:4002 | jq
This opens a duplex connection and you should see messages indicating successful connections like:
{
  "peer": "bob-node",
  "seq": 0,
  "tag": "PeerConnected",
  "timestamp": "2023-08-17T18:25:02.903974459Z"
}
{
  "headStatus": "Idle",
  "hydraNodeVersion": "0.12.0-54db2265c257c755df98773c64754c9854d879e8",
  "me": {
    "vkey": "ab159b29b87b498fa060f6045cccf84ecd20cf623f7820ed130ffc849633a120"
  },
  "seq": 1,
  "tag": "Greetings",
  "timestamp": "2023-08-17T18:32:29.092329511Z"
}
You can use the hydra-tui to view the state of the node and perform actions
as well. For example, to run the TUI for alice:
hydra-tui -k credentials/alice-funds.sk
Step 4. Open a Hydra head
Using the jq enhanced websocat session, we can now communicate with the hydra-node through its WebSocket API on the terminal. This is a duplex connection and we can just insert commands directly.
Send this command to initialize a head through the WebSocket connection:
{ "tag": "Init" }
The initiation process might take some time as it includes submitting a transaction on-chain. Upon successful initiation, both Hydra nodes and their clients will display a HeadIsInitializing message, listing the parties required to commit.
To commit funds to the head, choose which UTxO you would like to make available on layer 2. Use the HTTP API of hydra-node to commit all funds given to {alice,bob}-funds.vk beforehand:
- Alice
- Bob
cardano-cli query utxo \
  --address $(cat credentials/alice-funds.addr) \
  --out-file alice-commit-utxo.json

curl -X POST 127.0.0.1:4001/commit \
  --data @alice-commit-utxo.json \
  > alice-commit-tx.json

cardano-cli transaction sign \
  --tx-file alice-commit-tx.json \
  --signing-key-file credentials/alice-funds.sk \
  --out-file alice-commit-tx-signed.json

cardano-cli transaction submit --tx-file alice-commit-tx-signed.json
cardano-cli query utxo \
  --address $(cat credentials/bob-funds.addr) \
  --out-file bob-commit-utxo.json

curl -X POST 127.0.0.1:4002/commit \
  --data @bob-commit-utxo.json \
  > bob-commit-tx.json

cardano-cli transaction sign \
  --tx-file bob-commit-tx.json \
  --signing-key-file credentials/bob-funds.sk \
  --out-file bob-commit-tx-signed.json

cardano-cli transaction submit --tx-file bob-commit-tx-signed.json
Alternative: Don't commit anything
If you don't want to commit any funds and only want to receive on layer two, you can request an empty commit transaction as shown below (example for bob):
curl -X POST 127.0.0.1:4002/commit --data "{}" > bob-commit-tx.json
cardano-cli transaction submit --tx-file bob-commit-tx.json
After you've prepared your transactions, the hydra-node will find all UTxOs associated with the funds key and create a draft of the commit transaction. You'll then sign this transaction using the funds key and submit it to the Cardano layer 1 network.
Once the hydra-node sees this transaction, you should see a Committed status displayed on your WebSocket connection.
When both parties, alice and bob, have committed, the Hydra head will open automatically. You'll see a HeadIsOpen message appear in the WebSocket session, confirming the activation of the head. This message will include details such as the starting balance and UTxO entries. Notably, these entries will match exactly those committed to the head, including transaction hashes and indices, ensuring transparency and consistency.
The head is now operational and ready for further activities.
Step 5. Use the Hydra head
In this step, we'll demonstrate a basic transaction between alice and bob using the Hydra head. Hydra Head operates as an isomorphic protocol, meaning that functionalities available on the Cardano layer 1 network are also available on the layer 2 network. This compatibility allows us to use familiar tools like cardano-cli for transaction creation within the head.
In this example, we will transfer 10 ada from Alice to Bob. Adjust the transaction amount based on the balances previously committed to the head.
First, we need to select a UTxO to spend. We can find a UTxO by referring to the utxo field in the most recent HeadIsOpen or SnapshotConfirmed messages. Alternatively, we can query the current UTxO set directly from the API:
curl -s 127.0.0.1:4001/snapshot/utxo | jq
From the response, we would need to select a UTxO that is owned by alice to
spend:
curl -s 127.0.0.1:4001/snapshot/utxo \
  | jq "with_entries(select(.value.address == \"$(cat credentials/alice-funds.addr)\"))" \
  > utxo.json
Next, similar to the Cardano layer 1, build a transaction using the cardano-cli that spends this UTxO and sends it to an address. If you haven't done so already, obtain the address of your partner to send the funds to (in this case, credentials/bob-funds.addr, which alice would not have automatically).
LOVELACE=1000000
cardano-cli transaction build-raw \
  --tx-in $(jq -r 'to_entries[0].key' < utxo.json) \
  --tx-out $(cat credentials/bob-funds.addr)+${LOVELACE} \
  --tx-out $(cat credentials/alice-funds.addr)+$(jq "to_entries[0].value.value.lovelace - ${LOVELACE}" < utxo.json) \
  --fee 0 \
  --out-file tx.json
Note that we need to use the build-raw version because the client cannot (yet?) index the Hydra head directly and would not find the UTxO to spend. This means we also need to create a change output with the correct amount. Additionally, since we have set the protocol parameters of the head to have zero fees, we can use the --fee 0 option.
Before submission, we need to sign the transaction to authorize spending alice's funds:
cardano-cli transaction sign \
  --tx-body-file tx.json \
  --signing-key-file credentials/alice-funds.sk \
  --out-file tx-signed.json
Submit the transaction through the already open WebSocket connection. Generate the NewTx command for WebSocket submission:
cat tx-signed.json | jq -c '{tag: "NewTx", transaction: .}'
The transation will be validated by both hydra-nodes and either result in a
TxInvalid message with a reason, or a TxValid message and a
SnapshotConfirmed with the new UTxO available in the head shortly after.
🎉 Congratulations, you just processed your first Cardano transaction off-chain in a Hydra head!
Step 6. Closing the Hydra head
Any participant can initiate closing the Hydra head. Use the WebSocket API to submit the closing command:
{ "tag": "Close" }
The hydra-node will then submit a protocol transaction with the last known snapshot to the Cardano network. A smart contract on layer 1 will check the snapshot signatures and confirm the head is closed. The WebSocket API sends a HeadIsClosed message when this' Close' transaction is observed. Note that this can also happen if any other hydra-node closes the head.
You might need to submit the Close command multiple times if the head is not getting closed within approximately 30 seconds.
See #1039 for details.
The message will include a contestationDeadline, set using the configurable --contestation-period. Until this deadline, the closing snapshot can be contested with a more recent, multi-signed snapshot. Your hydra-node would contest automatically for you if the closed snapshot is not the last known one.
We need to wait now until the deadline has passed, which will be notified by the
hydra-node through the WebSocket API with a ReadyToFanout message.
At this point, any head member can issue distribution of funds on layer 1. You can do this through the WebSocket API one last time:
{ "tag": "Fanout" }
This will submit a transaction to layer 1. Once successful, it will be indicated by a HeadIsFinalized message that includes the distributed utxo.
To confirm, you can query the funds of both alice and bob on layer 1:
echo "# UTxO of alice"
cardano-cli query utxo --address $(cat credentials/alice-funds.addr) --out-file /dev/stdout | jq

echo "# UTxO of bob"
cardano-cli query utxo --address $(cat credentials/bob-funds.addr) --out-file /dev/stdout | jq
That's it. That's the full life cycle of a Hydra head.
Bonus. Be a good citizen
As we have taken our funds from the testnet faucet and we do not need them
anymore, we can return all the remaining test ada of alice and bob back to the
faucet (before we throw away the keys):
- Alice
- Bob
cardano-cli query utxo \
  --address $(cat credentials/alice-node.addr) \
  --address $(cat credentials/alice-funds.addr) \
  --out-file alice-return-utxo.json

cardano-cli transaction build \
  $(cat alice-return-utxo.json | jq -j 'to_entries[].key | "--tx-in ", ., " "') \
  --change-address addr_test1qqr585tvlc7ylnqvz8pyqwauzrdu0mxag3m7q56grgmgu7sxu2hyfhlkwuxupa9d5085eunq2qywy7hvmvej456flknswgndm3 \
  --out-file alice-return-tx.json

cardano-cli transaction sign \
  --tx-file alice-return-tx.json \
  --signing-key-file credentials/alice-node.sk \
  --signing-key-file credentials/alice-funds.sk \
  --out-file alice-return-tx-signed.json

cardano-cli transaction submit --tx-file alice-return-tx-signed.json
cardano-cli query utxo \
  --address $(cat credentials/bob-node.addr) \
  --address $(cat credentials/bob-funds.addr) \
  --out-file bob-return-utxo.json

cardano-cli transaction build \
  $(cat bob-return-utxo.json | jq -j 'to_entries[].key | "--tx-in ", ., " "') \
  --change-address addr_test1qqr585tvlc7ylnqvz8pyqwauzrdu0mxag3m7q56grgmgu7sxu2hyfhlkwuxupa9d5085eunq2qywy7hvmvej456flknswgndm3 \
  --out-file bob-return-tx.json

cardano-cli transaction sign \
  --tx-file bob-return-tx.json \
  --signing-key-file credentials/bob-node.sk \
  --signing-key-file credentials/bob-funds.sk \
  --out-file bob-return-tx-signed.json

cardano-cli transaction submit --tx-file bob-return-tx-signed.json